Showing posts with label Naalumani. Show all posts

Monday, April 6, 2015

Healthy cookies

These are my favorite cookies and I make at least one batch a week. My kids savor this during the snack time, and I allow them without any guilt, as they contain all nutritious stuff.


Ingredients

Whole wheat flour - 1 cup
Raggi flour - 1/4 cup
Arrowroot powder(koovapodi) - 1/4 cup
Note : If raggi & arrowroot flour is not available, you can substitute with whole wheat flour, in which case, take 1.5 cups of wheat flour
Oats - 3/4 cup
Broken cashew - 2 tbsp (optional)
Chocolate chips - handful (brown or white) (optional)
Soft brown sugar - 3/4 cup (adjust as per your taste)
Sunflower oil - 3/4 cup
Baking powder - 1 tsp
Egg - 1
Water - 4-5 tbsp


Method

1. Sieve together wheat flour, raggi flour, arrowroot powder & the baking powder. Mix in the oats, cashew & chocolate chips. Keep it aside.
2. In a deep bowl, whisk together oil and egg. Slowly add in the brown sugar and mix well.
3. Now add the dry ingredients into the wet mixture and combine well. If the mixture is thick, add water little by little. The consistency should be wet, but you should be able to make balls out of the mixture. If its difficult to handle at this stage, refrigerate the mixture for 1 hr
4. Take the mixture out, wet your hands and take a small ball of the mixture. Press it lightly on your palm and arrange it on a baking tray. Repeat till all the mixture is used up.
5. Pre-heat the oven to 180 degrees. Place the tray in the middle rack and bake for about 20 min. Take it out when the sides starts to brown lightly. Enjoy warm or you can place them in an airtight container once cooled.

Wednesday, December 17, 2014

Jackfruit Cookies

I fail..I fail..I fail...to understand why these beautiful, tasty, nutritious cookies haven't adorned our bakeries till now. I tried this purely out of curiosity, just to know how it will turn out. Made a batch of just 15, but they were all gone in sometime..especially my little one - she loved it to the core. It had a mild jackfruit flavor (not overpowering at all). I will definitely be making it again. They tasted awsome with evening tea.


This time around I made using the freeze dried ripe jackfruit (Jackfruit 365). Next time, may be, I will use the jackfruit jam (chakka varatti) so that I can cut down on the sugar too.


Ingredients

Whole wheat flour - 1 1/2 cups
Jackfruit pulp - 1/2 cup
Muscavado sugar - 3 tbsp
Sunflower oil - 1/4 cup
Baking Soda - 1/2 tsp
Almond Slivers - 2 tbsp (optional)


Method

1. Sieve together wheat flour and baking soda. Keep it aside.
2. Mix together the jack fruit pulp and muscavado sugar. You can use normal white sugar too
3. To this mixture, add the sunflower oil and mix well with a spoon. Add almond pieces too.
4. Add the flour mixture in small batches, till all of it come together as a smooth dough.
5. Pre-heat the oven to 180 deg.
6. Take small lemon sized balls, place it on a baking sheet. Press slightly with a fork.
7. Bake for 10-12 min
8. Cool well before storing


Sunday, December 14, 2014

Raggi / Finger Millet Cookies

Its been sometime since I have been trying to add this millet into our diet. I know people make puttu, idiyappam etc with its nutritious flour. But I wasn't very sure how my kids will take it. So thought of replacing whole wheat flour with raggi flour in a cookie recipe. And me being a DIY mom, am bit reluctant to buy the ready-made flour. So had to wait till the weekend to clean, wash, dry, grind, sieve the raggi so that I can make the cookies.

I personally prefer the whole wheat version of this to the finger millet version, But its been a huge hit with my kids, who finished the dabba in 2 days. And I am happy to pack this snack for the kids' snack box.


Here goes the recipe. This is a very basic and flexible recipe. You can play around with the ingredients like me, I added in chia seeds, almond slivers etc to make it super healthy.

Ingredients

Raggi / Finger Millet flour (very fine) - 2 cups (or you can use half whole wheat flour and half raggi flour)
Eggs - 2
Baking soda - 1/2 tsp
Dark Muscavado /brown / white sugar - 3/4 cups (check sweetness, add more if needed)
Oats - 1/4 cup
Sunflower oil - 1/2 cup (add in batches, you just need enough to bring the dough together)
Water - 2 tbsp (if needed)
Hershey's chocolate chips - 1/2 cups (optional)
Almond slivers - 2 tbsp (optional)
Chia seeds - 1 tbsp (optional)


Method

1. In a deep bowl, add the egg and lightly beat it.
2. Add the oil, muscavado sugar and mix well till it all mix together
3. Sieve or mix together flour, baking soda, oats.
4. Mix the chocolate chips, chia seeds, slivered almonds.
5. Pre-heat the oven to 180 degrees
6. Slowly add the wet mixture into the dry ingredients, mix well using a wooden spoon, till it forms a homogeneous mixture. Check the sweetness, add more sugar if needed.
7. Prepare a cookie sheet (or aluminium foil), place a dollop of cookie mixture on this. Give enough space in between as once heated, it will start to space out. Its good to use a spoon to transfer the mixture to baking tray. Or wet your hand for scooping the mixture.
8.  Once the oven is hot, place the cookie tray into the oven and bake for about 10 min. 

Tuesday, December 9, 2014

Kappa Puzhungiyathum Mulaku Chammantheem (Boiled Tapioca with onion-chilly chutney)

This dish doesn't need an intro for a malayali. We all have tasted it atleast once in our lifetime and is one of our treasured dishes. Its simple, yet the taste outstanding.


Ingredients

Tapioca - 1 big (cut into big chunks)
Water - enough to cover the tapioca pieces
Salt  - as needed

Method

Cut tapioca into big chunks. Wash it well and add enough water and let it boil. When it starts boiling, add salt. Once the tapioca is cooked (check with a knife), drain water and keep aside.


Mulakuchammanthi (Onion-chilly chutney)

Ingredients

Small onion - 5-6
Kanthari mulaku - 2-3
Tamarind -  a very small piece (optiona)
Salt - as needed
Coconut oil - 1 tbsp

Method

Clean the small onions. Crush them together with chilly, salt and tamarinfd (if using). Once thoroughly crushed, remove this to a small bowl. Check salt and add the coconut oil. Mix well.

Wednesday, December 3, 2014

Achappam / Kerala Rosette cookies

Achappam...haa...brings a lot of childhood memories. The brightest being the image of my grandmom making tins and tins of these fried goodies before every Christmas and Easter. But we see these tins only on the day of making them; after that they vanish. Then a much smaller tin appears - which can hold hardly 8 -10 achappams or kuzhalappams..now thats the ration for a week. Can't blame her.. in a house of 3 (always) hungry kids, 3 adults and (atleast 2) helpers, one need to ensure these tins lasts atleast a month. So for the next one month the evening tea-time snack will be these beautifully shaped achappams.


This is the first time I am trying my hands at these. Got hold the achu (mould) from my nneighbor..Thanks Madhoo!! Then straight away called up my grand-mom, got the recipe along with the tricks to handle achu and the batter consistency. Some of the tips below.

- For making the achappams, always use freshly ground rice powder. Never use roasted rice flour.
- The ground flour should be sieved well, and only very fine flour should be used.
- The rice - egg ratio is 4 big cup (naazhi) : 4 eggs (I used 1 naazhi equivalent to about 3 normal measuring cup and 1 egg). For this amount, about half of a coconut should be used
- 3 cups of rice gave me about 4 cups of very flour
- Before using the achu, dip in hot salted water for sometime (about an hour). Then wipe it clean.
- When the oil starts boiling, dip the achu in this oil for atleast 5 minutes. The achu should be hot enough, else the batter stick to the mould. When the mould is dipped into the batter, you should hear a sizzling sound.
- The batter thickness is very important. It should be of the thickness of vattayappam - semi thick that should be.
- If the batter is too thick, add little more coconut milk or water. If its thin, then add little more rice flour or even little maida will work.
- The mould should be dipped only 3/4th in the batter. If you dip completely, then the achappams will not get released from the mould
- There should be enough oil for deep frying. And it should be really hot.


 Now on to the recipe..

White rice - 4 cups (I used sona masuri rice) - when ground you should have about 7-8 cups of fine flour
Coconut milk - about 2 cups (extracted from 3/4th of a coconut grated)
Egg (beaten) - 1
Salt - as needed
Sugar - 2 tbsp
Cumin seeds - 1 tsp
Black sesame seeds - 1 tsp

Making the rice flour : Soak the rice in enough water for atleast an hour. Drain well, spread it on newspaper and allow to dry (for about half hr). Once dry (it should not be too dry, should be slightly moist), put it in mixer (in batches) and grind to fine powder. Sieve them and measure.

Take the rice flour in a bowl (steel recommended, as you will be dipping hot iron mould into this, and you do not want the plastic to melt).
Add enough salt and sugar (if using)
Add the coconut milk, 1 cup at a time. Ensure you get a semi-thick consistency.
Add the beaten egg
Sprinkle the cumin and sesame seeds and give a good stir.
Heat oil in a thick bottomed vessel. Dip the mould in this oil for atleast 5 min, till the oil is really hot. Now dip the mould in the batter and immediately transfer it to the oil. It will sizzle for a while. Now using a fork, slightly push the (now firming up) achappam into the oil. Cook both sides. Once done, drain the oil and let it cool on a kitchen towel
Repeat for the whole batch. Once all the achappams are cooled well, transfer them to an airtight container.


PS : It is time-consuming!! and might test your patience. The batter will sometimes show an attitude and will not remove itself from the mould...But still be patient..your efforts will be paid off..

Monday, April 21, 2014

Banana Muffins

I just followed the Banana Bread recipe and just added couple of tbsp of milk to loosen up the batter since it was thick. And finally sprinkled some choco-chips on top. They made a yummy treat.


Saturday, March 8, 2014

Kozhukatta aka stuffed rice dumplings

Warm memories of school days flood my mind when I hear of Kozhukatta...again..my grandma's kozhukattas were the best!! Sometimes I make the traditional naalumani palaharams (tea-time snacks) just to make sure that my kids get to eat what we ate as kids...and they are crazy of most of them.


Yesterday when I made them, my little boy immediately recognized it.." Amma, this is the same snack that the boy in 1983 (a malayalam movie we saw the day before) ate during cricket practice". See how the images get absorbed by 6 year olds...it was just a passing shot in the movie song..

Ingredients

Rice flour - 3/4 cup
Boiling water - almost 3/4 cup (adjust according to the consistency)
Salt - 2 pinches

Grated coconut - 3/4 cup
Ghee - 2 tsp
Grated jaggery / Jaggery syrup / Muscavado sugar / white sugar - 2 tbsp
Broken cashew - 1 tbsp (optional)
Banana - 1/2 cup (cut into small pieces, optional)
Salt - a pinch
Cumin seeds - a pinch
Cardamom powder - a pinch


Method

1. Mix rice flour with salt. Add boiling water to the flour and first mix with a spoon. When the heat is bearable, knead with hand until you get a smooth pliable dough. Keep it aside. Always cover it, otherwise it will dry up quickly.
2. Heat a small pan and add the ghee. When it melts, add the cashews and let them fry for couple of minutes on medium flame.
3. Next add the chopped banana pieces if using. Let them saute for another 2-3 minutes.
4. Add the grated coconut, jaggery/sugar, cashew, salt, cumin. Let it be on low flame till jaggery melts and all of them are mixed up well. Switch off the stove and sprinkle the cardamom powder
5. Now divide the rice flour dough into 5 equal parts. Roll out one ball (either by a rolling pin or just flatten on your palm), place a heaped tbsp of coconut mixture in the center and close up the ends (just like how you do the aloo porotta).
6. Repeat for rest of the balls. Place all them in a steamer and steam them for a min of 10 min.


Saturday, February 8, 2014

Pazham pori / Banana Fritters

I think more than 60% of malayees would claim that their favourite tea time snack is pazham pori aka banana fritters...such is the popularity of this snack in God's own country! Pazham pori is one snack that brings a lot of childhood memories...the day our grandmom makes pazham pori for tea-time, one fight is sure to happen..as my brother will get atleast one more than me...I can compromise on any other snack, but not this one.

I have had this from many a places so far...but can safely say that my Grandmom's is THE BEST. I think the secret is using atta instead of maida, complementing with little rice powder to make it crisp.


Ingredients

Ripe Banana - 2, cut into half, and then slit lenghtwise into 2-3 pieces
Atta - 1/2 cup
Fine Rice powder - 2 tbsp
Salt - a pinch
Sugar - about 1 tbsp
Turmeric powder - a pinch
Oil - for frying


Method

1. Make a thick batter using atta, rice powder, turmeric, salt and sugar along with little water. I dont have a proper measurement of water, but the batter should not be watery or flowy. It should have the consistency of idly batter.
2. Heat oil for frying
3. Dip each banana piece in this batter and drop into the oil. The heat should be medium - high.
4. When one side is done, overturn and cook the other side too.

And enjoy with a hot cup of tea..

Tuesday, January 28, 2014

Banana Bread


What will you do if you have got 2 big bunches of ripe banana (ethapazham) sitting in your kitchen, threatening to go from ripe to over-ripe to rotten within few days!! I was in complete dilemma the last 3-4 days, as my hubby who traveled to India came back with a really big bunch of plantains (lovingly packed my MIL). It is home grown, organic and all that stuff, which means you just can't throw it. While my hubby was away in India, I made a very relaxing trip to Lulu and had bought the week's grocery which included around 4 big bananas...I wasn't expecting him to come back with a 20 kg baggage full of fruits and vegetables from the backyard.


Since I had to use up all of those 11 really ripe bananas within few days, here is what I did...

Day 1 - I, along with my kids ate bananas as it is...3 gone
Day 2 - Made some pazham pori / banana fritters (post pending to be posted) - 3 gone
Day 3 - Made banana bread - 3 gone
Day 4 - Made pazham nirachathu / stuffed banana (pending post) - 2 gone

Hurray!! so I used up all of them without wasting even a li'l bit, and without my family getting bored of eating the same thing everyday..


Now coming to banana bread, I have made this n number of times before...but using Chiquita bananas. This is the first time I am using Kerala's own nethrakkaya for this...and it was super-duper delicious. Our home-taster (my son) gave a thumbs up and "Super" (which he rarely utters) after the first bite. This bread is slightly dense compared to the one using chiquitas, but the taste was incomparable. Above all its super-easy to make this. 


This is a very basic/flexible recipe, and you can make modifications as per things available in your kitchen, or as per your liking.


Ingredients

Very ripe (Kerala) banana - 3 (if using chiquitas, you'll need around 4)
All purpose flour - 1 cup
Whole wheat atta -1/2 cup (you can use only all purpose flour, or increase the amount of atta)
Sugar - 1 cup (I used Demarera sugar, you can use white, or soft brown or a mix of both)
Baking powder - 1 tsp
Butter - 1 stick / 100g, melted (you can use oil instead)
Salt - a pinch
Chocolate chips - 1/2 cup (optional)

Method

1. Pre-heat the oven to 180 degree Celsius
2. Prepare a 9 x 5" loaf tin (grease and dust with flour)
3. Prepare the dry ingredients. Sieve together the wheat flour, all purpose flour, baking powder, baking soda and salt, couple of times.
4. Melt butter in a sauce pan, and allow to cool.
5. Take the big jar of the mixer and add the chopped bananas. Puree it well in the mixie.
6. Now to the same jar, add the sugar and melted butter along with the banana puree and pulse of 3-4 times till the sugar, butter and banana are incorporated well.
7. Move the banana mixture into a bowl and slowly mix in the flour mixture until all are well incorporated.
8. Add half the amount of chocolate chips into the mixture and give a gentle mix. 
9. Pour the batter to the prepared tin and sprinkle rest of the chocolate chips on the top.
10. Bake in the pre-heated oven for about 40 min (this will depend on the size of your oven, so keep checking after about 35 min) or until an inserted toothpick comes out clean.


Tuesday, December 3, 2013

Jackfruit Unniyappam

I have not made the traditional unniyappams yet, using banana..my unniyappams are quick fix ones using the jackfruit halwa (chakka varatti) thats always there in my freezer.


Ingredients

Jackfruit halwa / chakka varatti - 1 cup
Rice flour - 2 cups
Jaggery syrup - 1 cup (if you need it to be more sweet, add either more jaggery or brown sugar)
Black sesame seeds - 3 tbsp
Salt - a pinch
Sliced coconut - 1/4  cup (roasted)

Method

Mix chakka varati, rice flour and jaggery syrup well, either with your hands or using a ladle. Add more water as needed, the mixture should have a thick flowy consistency. Add the roasted coconut pieces, salt and sesame seeds, mix well. Set the mixture aside for atleast 1 hr.


Heat the unniyappa chatti, and fill 1/4th each impression with oil. When the oil is hot, pour the jackfruit mixture using a ladle or spoon into each impression. Once the bottom side is cooked (which takes about 5min), using a spoon, turn the unniyappams upside down and cook for another 5 min. After that remove the unniyappams and drain oil. Repeat the process till the whole batter is used.

Sunday, November 17, 2013

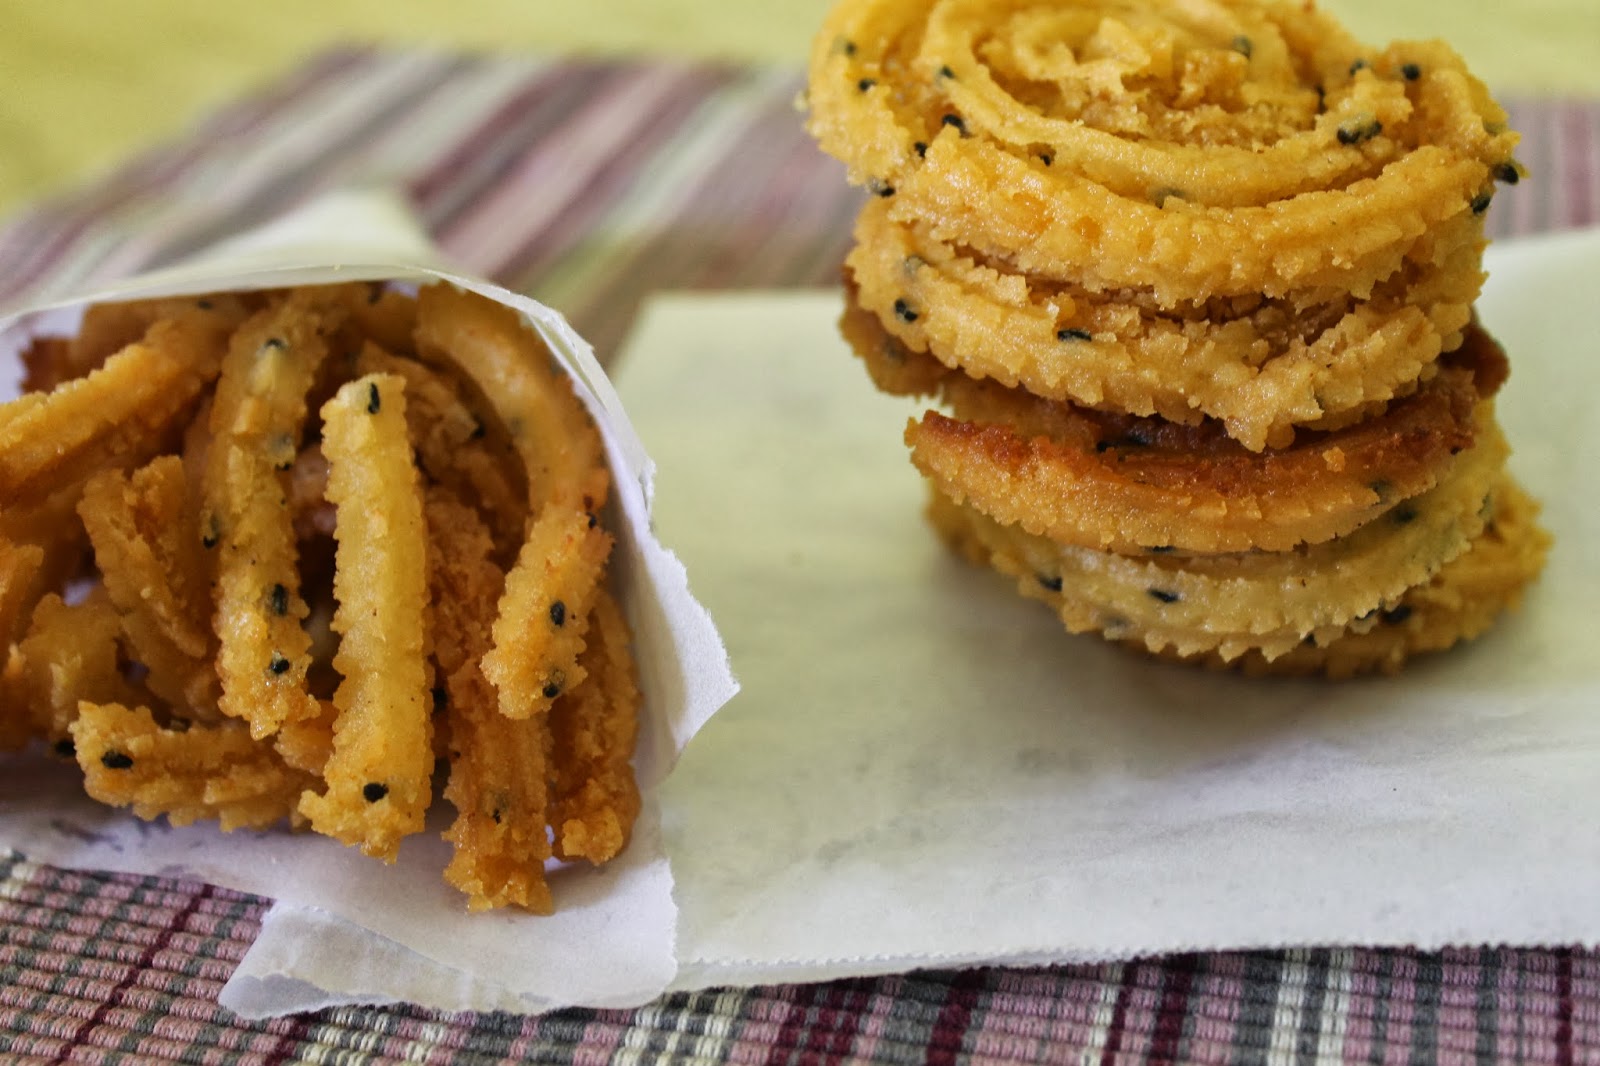
Murukku / Chakli

An all-time favourite snack...can be eaten at any time of the day...can gorge on any number of chaklis at a time...one of the best accompaniments for tea...enjoyed by every age-group...


The explanations above shows how much this snack is enjoyed by Indians...and perhaps this is one snack that can be seen throughout India ...south to the north..

There are various ways of making this delicious snack, although the ingredients (urid dal, rice powder, asafoetida, sesame) remain the same..
One way is to dry-fry urid dal, powder it and then mix it with rice powder and rest of the ingedients to form a firm dough.
Another way is to soak urid dal, and then wet grind it and then mix it rest of the ingredients. My grandma suggested to add grated coconut while wet grinding the daal, which gives a rich coconuty flavour to the snack.

However, my favorite method is the one I saw in Vanitha few years back...which is to cook the daal and then mix it with other ingredients. The chaklis made these way are not as hard as the ones prepared by other methods and also very crunchy and easy on kids. The only disadvantage is that the dough need to be handled carefully as its very soft and extra care should be taken while squeezing it out of the achu (chakli maker) as they could easily break.


So here goes the recipe..

Ingredients

Moong dal - 1/4 cup
Urid dal - 1/2 cup
Rice powder - 1 1/2 cups (double the amount of dals)
Asafoetida - 1 tsp
Black sesame seeds - 2 tbsp
Salt - as needed
Cumin seeds - 2 tsp (optional)
Chilly powder - 1 tsp (optional)

Oil - as required to fry the chaklis

Method

Cook the moong and urid dal in a pressure cooker by adding 1 cup of water. Once cooked, keep it aside to release the pressure and let it cool down after that. Once cooled, add all the ingredients and knead with your hand to form a smooth dough. Take a chunk of dough and place it inside the chakli maker and squeeze it onto a butter paper in the desired shape of chakli.


Heat a deep bottom pan and pour the required amount of oil. Once its very hot (keep on high flame), carefully transfer the shaped chaklis into the pan. Fry them till golden brown.


Thursday, November 14, 2013

Idli Dumplings

Have got left idli batter sitting in the fridge? Dont worry, no need to throw it away...just add some chopped onions, chilly, ginger and curry leaves and cook them in unniyappa chatti ...A delicious evening snack is ready for the kids!


Ingredients

Idli batter -  2 cups (or less)
Big onion - 1 medium, finely chopped
Green chilly - 1, finely chopped
Ginger - 1 inch piece, grated or chopped
Curry leaves - 1 sprig
Salt - as per taste

Method

Add all the ingredients together and mix well. Check for salt and add if needed. Heat the unniyappa chatti, add little oil to each of the impressions. When the oil is hot enough, pour 1 tbsp of batter into the impressions. When the bottom side is cooked, turn them upside down and cook the other side too. Remove from the chatti and serve hot with some coconut chutney.


Wednesday, October 30, 2013

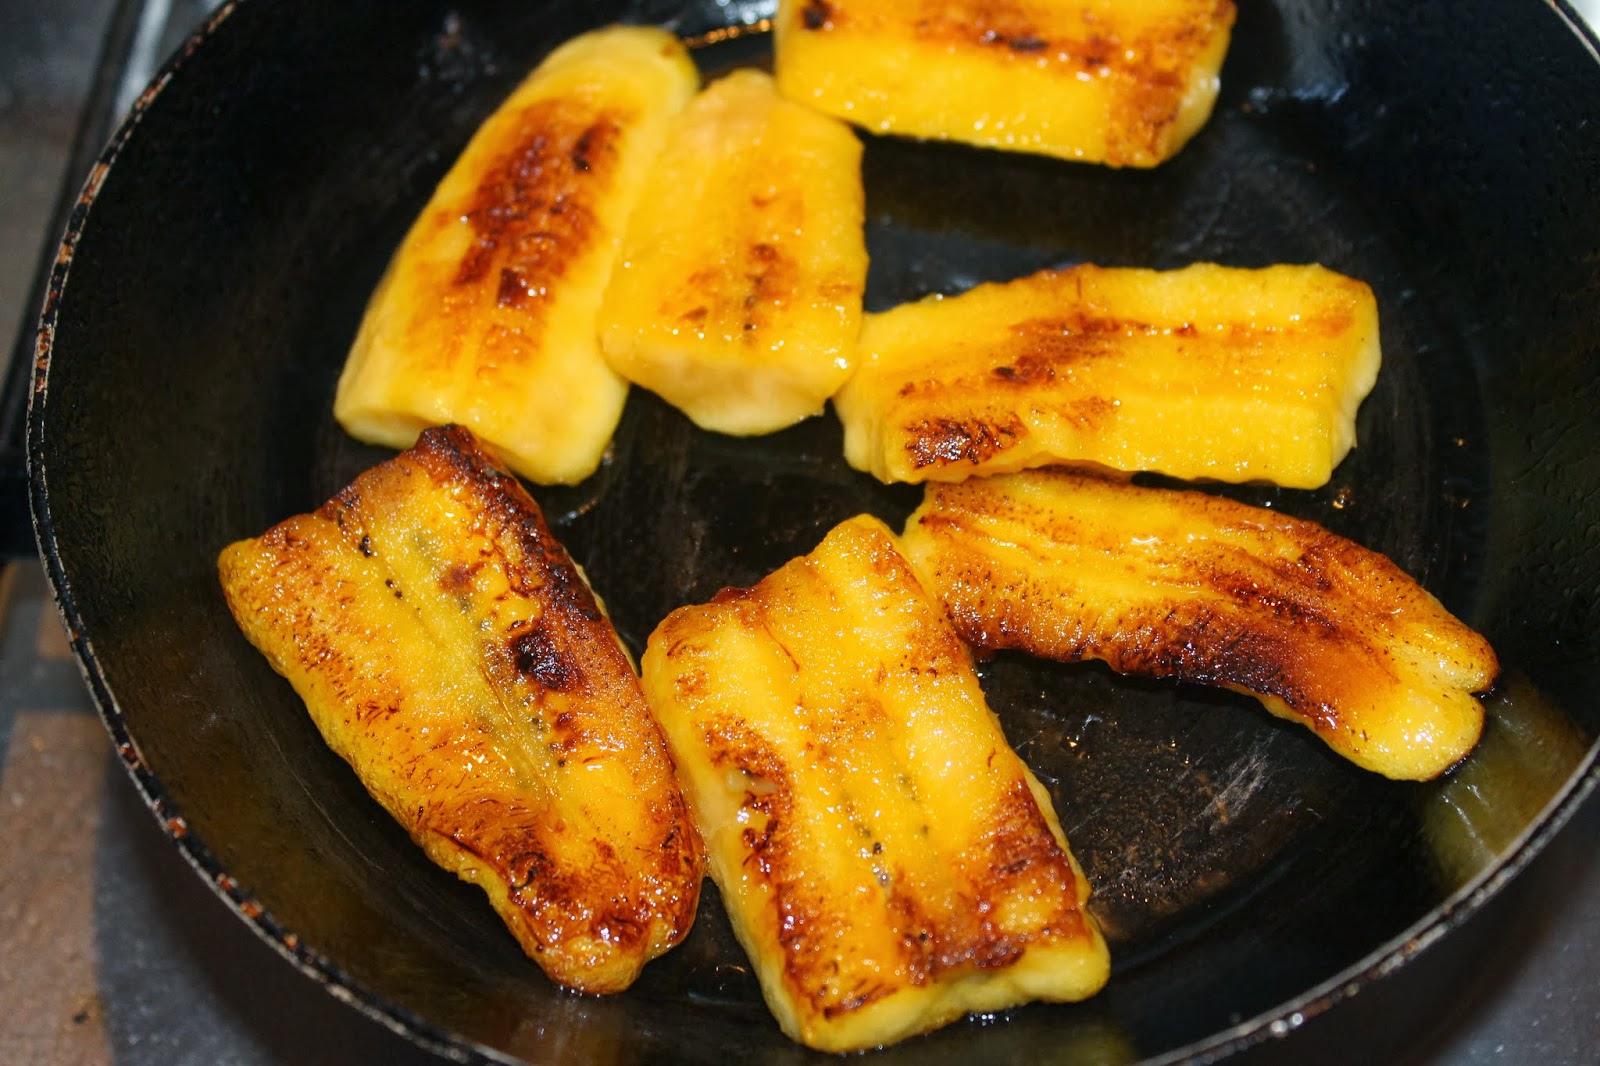
Ghee fried Caramelised Bananas (Ethapazham)

Over ripe bananas (not chiquita) are an eye-sore in the kitchen. Here is one way I make use of them, and my kids love it too.


Ingredients

Over ripe banana (ethapazham) - 2, Cut into half and then slit lengthwise into 3 slices
Ghee - 1 tsp
Sugar - 1 tbsp

Method

Heat a non-stick pan and add 1 tsp ghee to it. When hot, place the banana slices on it, donot over-crowd the pan. Keep it in medium heat. Once the side starts to brown, sprinkle some sugar over it. Turn the slices so that the other side also starts to brown. Sprinkle some more sugar. Wait for a minute for the sugar to caramelize. Slowly move the slices in that pan so that they don't stick to the bottom of the pan. Once done, remove the banana slices to the serving plate.