A Mickey Mouse cake for a cute girl next door!! I know the pictures haven't come out good, as I was really rushing to be on time for the birthday. And yes, I had the Wilton pan which gave me this shape. But doing the star shaped (Tip 16) icing throughout the cake really tested my patience, the end product is worth all the effort though.

Saturday, January 11, 2014
Wednesday, January 8, 2014
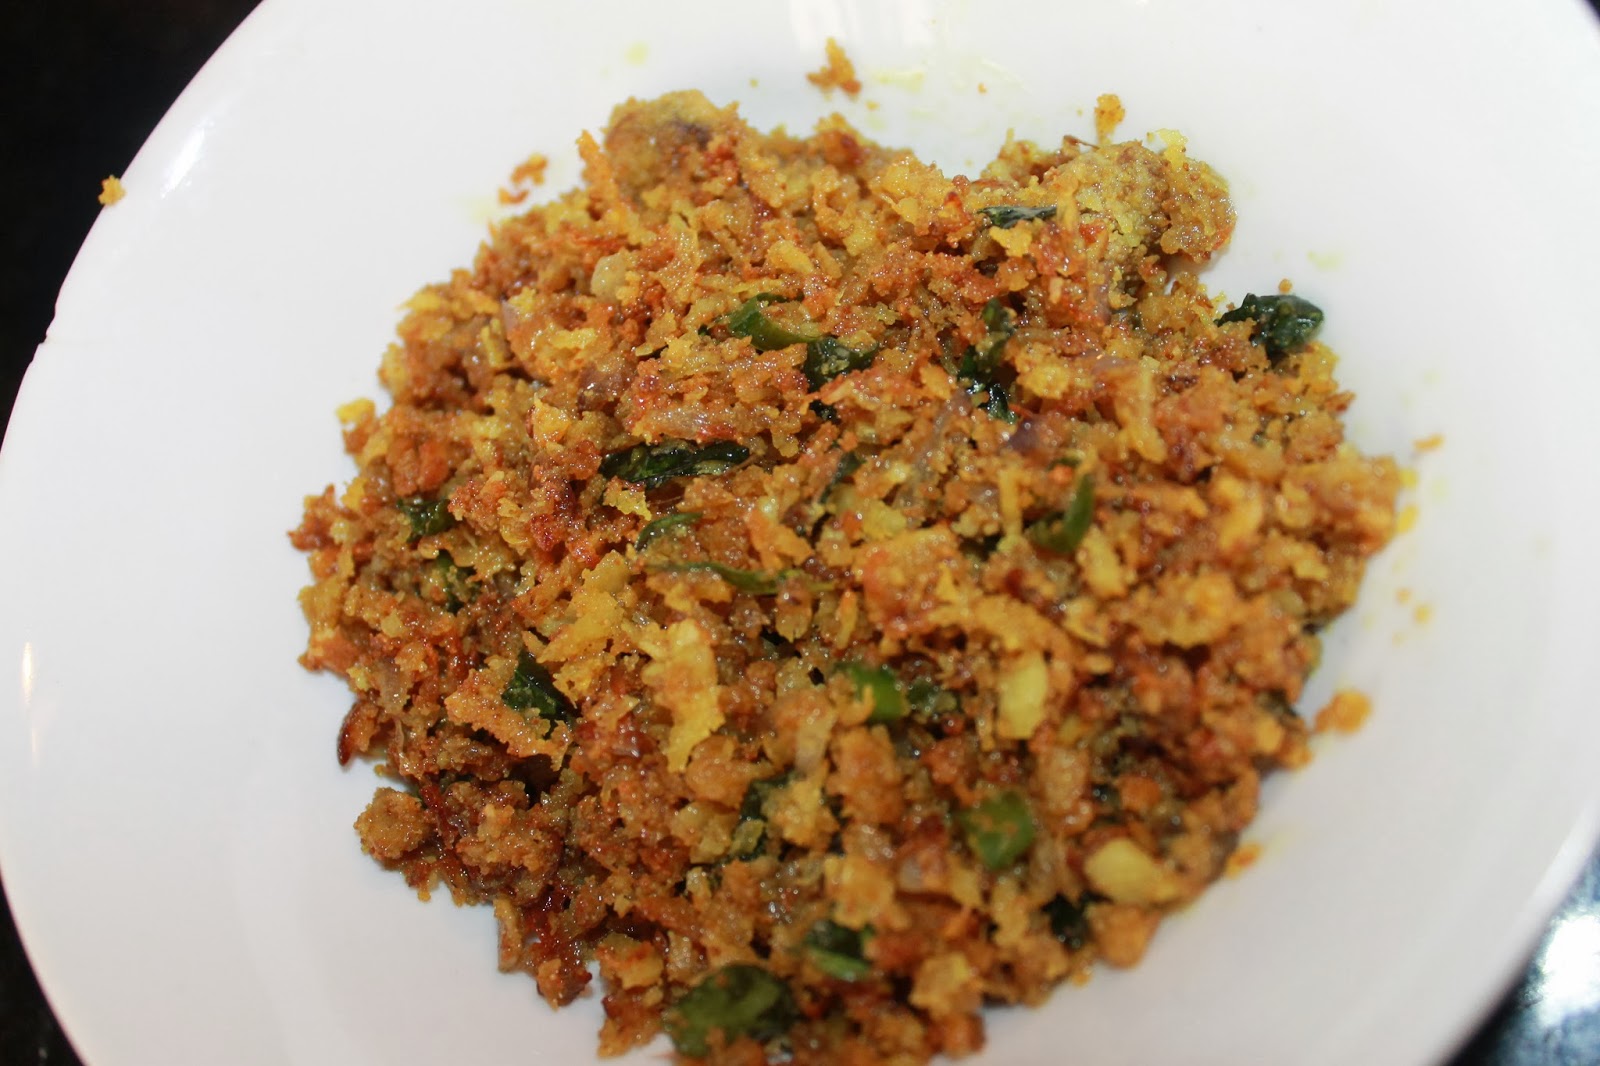
Meenmutta fry / Fish roe fry with coconut
Don't know how many of you have really had it... this is one of the best accompaniments for rice. And you can really eat 2-3 servings of rice with just a little of this meenmutta fry...its soooo yum.

Ingredients
Meen mutta / Fish roe - medium one
Small onions - 6, thinly sliced
Green chilly - 2, thinly sliced
Ginger - 1 tsp, grated
Curry leaves - 1 sprig
Grated coconut - 1/2 cup
Salt
Coconut oil - 2 tbsp
Method
Mix all the ingredients together, mix (with hand) the fish roe too along with this. Keep it aside for some time.
Heat oil in a non-stick pan. When hot, add the fish roe mixture to it and fry in a low heat till the whole thing is cooked and turns crisp.
Note : This can be made only with fish roe of bigger fishes like King fish (neymeen / Ayikkoora) , Black pomphret etc.
Ingredients
Meen mutta / Fish roe - medium one
Small onions - 6, thinly sliced
Green chilly - 2, thinly sliced
Ginger - 1 tsp, grated
Curry leaves - 1 sprig
Grated coconut - 1/2 cup
Salt
Coconut oil - 2 tbsp
Method
Mix all the ingredients together, mix (with hand) the fish roe too along with this. Keep it aside for some time.
Heat oil in a non-stick pan. When hot, add the fish roe mixture to it and fry in a low heat till the whole thing is cooked and turns crisp.
Note : This can be made only with fish roe of bigger fishes like King fish (neymeen / Ayikkoora) , Black pomphret etc.
Mathicurry / Sardines in tangy coconut sauce
One of my favorite sardine preparation, and my grandmother's signature dish. The taste really depends on the tanginess of the green mango.

Ingredients
Sardines - 6 (cleaned, cut into half)
Green mango sliced - 1 cup (depends on the tanginess. If the mangoes aren't tangy enough, add more green mango or adjust with some dried green mango like I did)
Small onions - 6
Garlic - 2 big cloves
Ginger - 1 inch piece
Curry leaves - 1 sprig
Coconut oil - 2 tbsp

For Grinding
Grated coconut - 2 cups
Water - 1 cup
Chilly powder - 2 tsp (I used an additional 1 tsp of Kashmiri chilly powder too, just to get the colour right)
Grind the above to a smooth paste.
For tempering
Small onions - 3, thinly sliced
Curry leaves - 1 sprig
Coconut oil - 1 tbsp

Method
Heat a manchatti and add the coconut oil. Crush small onions, garlic and ginger using a mortar and pestle. Add the crushed mixture to the heated oil and saute for couple of minutes. Throw in a sprig of curry leaves. Now add the ground coconut mixture into it. Stir well. Once it starts to boil, add the sliced raw mango pieces and the cleaned sardines. Cover and cook. Open the lid in between and gently stir. Check for salt and add as required. Once the sardines are cooked well, switch off the stove. If the curry isn't tangy enough, add some vinegar towards the end.
In a non-stick pan, heat 1 tbsp of coconut oil and add sliced small onions and curry leaves. Once they turn brown and crisp enough pour it into the sardine curry and keep the chatti closed for sometime, to allow the flavours to set in. Your yummy sardine curry is ready!! It tastes wonderful with boiled rice as well as puttu.
Ingredients
Sardines - 6 (cleaned, cut into half)
Green mango sliced - 1 cup (depends on the tanginess. If the mangoes aren't tangy enough, add more green mango or adjust with some dried green mango like I did)
Small onions - 6
Garlic - 2 big cloves
Ginger - 1 inch piece
Curry leaves - 1 sprig
Coconut oil - 2 tbsp
For Grinding
Grated coconut - 2 cups
Water - 1 cup
Chilly powder - 2 tsp (I used an additional 1 tsp of Kashmiri chilly powder too, just to get the colour right)
Grind the above to a smooth paste.
For tempering
Small onions - 3, thinly sliced
Curry leaves - 1 sprig
Coconut oil - 1 tbsp
Method
Heat a manchatti and add the coconut oil. Crush small onions, garlic and ginger using a mortar and pestle. Add the crushed mixture to the heated oil and saute for couple of minutes. Throw in a sprig of curry leaves. Now add the ground coconut mixture into it. Stir well. Once it starts to boil, add the sliced raw mango pieces and the cleaned sardines. Cover and cook. Open the lid in between and gently stir. Check for salt and add as required. Once the sardines are cooked well, switch off the stove. If the curry isn't tangy enough, add some vinegar towards the end.
In a non-stick pan, heat 1 tbsp of coconut oil and add sliced small onions and curry leaves. Once they turn brown and crisp enough pour it into the sardine curry and keep the chatti closed for sometime, to allow the flavours to set in. Your yummy sardine curry is ready!! It tastes wonderful with boiled rice as well as puttu.
Pindi - Vanpayar thoran (Plantain stem and Red cow pea thoran)
One traditional dish from Kerala...and a pretty healthy one too..

Ingredients
Pindi / Plantain stem - 2 cups (cleaned, chopped)
Boiled Red cow peas - 1 cup
To grind coarsely
Grated coconut - 1 cup
Curry leaves - 1 sprig
Garlic - 1 clove
Small onion - 5
Cumin seeds - 1/2 tsp
Turmeric powder - 1/4 tsp
Green chilly - 4
Final cooking
Coconut oil - 1 tbsp
Curry leaves - 4-5
Method
Boil the chopped plantain stem/ pindi with little water, salt and turmeric powder. It will start releasing water, so halfway through you'll need to open the pan and cook so that all the water is evaporated / removed.
Cook the red cow peas separately.
Coarsely grind the items mentioned under "To grind coarsely" and keep aside.
In a pan or kadai, heat oil. Once hot, throw in the curry leaves and the ground paste. Let the coconut paste get cooked for couple of minutes. Now add the cooked pindi / plantain stem and red cow peas. Give everything a thorough mix. Check for salt. Once everything is combined well, remove from heat.
Ingredients
Pindi / Plantain stem - 2 cups (cleaned, chopped)
Boiled Red cow peas - 1 cup
To grind coarsely
Grated coconut - 1 cup
Curry leaves - 1 sprig
Garlic - 1 clove
Small onion - 5
Cumin seeds - 1/2 tsp
Turmeric powder - 1/4 tsp
Green chilly - 4
Final cooking
Coconut oil - 1 tbsp
Curry leaves - 4-5
Method
Boil the chopped plantain stem/ pindi with little water, salt and turmeric powder. It will start releasing water, so halfway through you'll need to open the pan and cook so that all the water is evaporated / removed.
Cook the red cow peas separately.
Coarsely grind the items mentioned under "To grind coarsely" and keep aside.
In a pan or kadai, heat oil. Once hot, throw in the curry leaves and the ground paste. Let the coconut paste get cooked for couple of minutes. Now add the cooked pindi / plantain stem and red cow peas. Give everything a thorough mix. Check for salt. Once everything is combined well, remove from heat.
Brocoli Mushroom Stir fry
As easy as it sounds...just clean both of it and throw into a pan with some olive oil and dried chilly. Sprinkle some salt..thats it!! A wonderful side dish for your chapati is ready, in less than 10 min (excluding the time taken for cleaning mushrooms :) ).

I first tasted it in Delhi, when we were visiting my aunt and uncle. There was an immediate connection. Asked aunty how she made it. So when we came back, I bought a box of mushrooms and brocoli. But it sat in fridge for almost 3 days, since I didn't how to clean the mushrooms. Nor I did I have enough time to check internet guru, as we were busy with the school re-opening. Today was relatively a free day, the kiddos and mommy have settled with the routine.
So here goes the recipe for the quick and easy stir fry.
Ingredients
Broccoli (cut into florets) - 2 cups
Mushrooms (cleaned and cut) - 1 cup
Olive oil - 1 tbsp
Dried chilly - 2
Method
Add olive oil to a skillet. When its hot enough, throw in the mushrooms along with dried chillies. Keep stirring, the mushrooms will start releasing water. Once the mushrooms are half cooked, add the broccoli florets and sprinkle some salt. The broccoli should not be over cooked, it should retain its crispness. Once the mushrooms and broccoli is cooked, remove from heat.
You can learn how to clean mushrooms from here.
I first tasted it in Delhi, when we were visiting my aunt and uncle. There was an immediate connection. Asked aunty how she made it. So when we came back, I bought a box of mushrooms and brocoli. But it sat in fridge for almost 3 days, since I didn't how to clean the mushrooms. Nor I did I have enough time to check internet guru, as we were busy with the school re-opening. Today was relatively a free day, the kiddos and mommy have settled with the routine.
So here goes the recipe for the quick and easy stir fry.
Ingredients
Broccoli (cut into florets) - 2 cups
Mushrooms (cleaned and cut) - 1 cup
Olive oil - 1 tbsp
Dried chilly - 2
Method
Add olive oil to a skillet. When its hot enough, throw in the mushrooms along with dried chillies. Keep stirring, the mushrooms will start releasing water. Once the mushrooms are half cooked, add the broccoli florets and sprinkle some salt. The broccoli should not be over cooked, it should retain its crispness. Once the mushrooms and broccoli is cooked, remove from heat.
Saturday, December 7, 2013
Basil & Rosemary Focaccia Bread
I saw this beautiful bread in Anushruti's blog. It was irresistable!! and had to make it at once. The focaccia had all my favorite ingredients... basil, rosemary, loads of olive oil...But I found the maida to be li'l too much, so made little tweaking here and there to suit our palate. This recipe is definitely a keeper...everyone at home enjoyed it very much.

Ingredients
Instant yeast - 2 tsp (i used little more than the original recipe since I was using atta)
Milk - 1 1/3 cup
Sugar - 1 tsp
Combine lukewarm milk and sugar. Sprinkle yeast over it and keep it aside for almost 10 minutes.
Whole wheat flour (I used Ashirwad Atta) - 1 1/2 cups
All purpose flour - 1 3/4 cups
Salt - 2 tsp
Olive oil - 3 tbsp (slight variation from original recipe which called for 2 tbsp, just because I love olive oil)
Attach dough hook to the stand in mixer. Sieve and add whole wheat flour to the bowl. Add maida, salt and olive oil. Give it a good mix. Add the yeast mixture and knead the mixture for about 5 minutes. I didn't need to add any more water, and the dough consistency (smooth and pliable) was perfect. Take it out of the bowl and knead with your hand for couple of minutes more. Slightly dust a clean surface and roll the dough in a rectangular shape. Slightly grease a 9 X 12" baking tray (using olive oil) and place the rolled out dough in this. Press and spread using your palms to fit in the tray. Cover with an aluminium foil and place it in a warm place for about 1 1/2 to 2 hrs till it doubles the volume.


Meanwhile prepare the herb infused olive oil, as mentioned below.

Olive oil - 1/4 oil
Basil leaves - 8 leaves , chopped
Rosemary (I used fresh) - 2 small sprigs
Garlic - 1 pod, crushed
Heat the olive oil and switch off when warm. Add the herbs and garlic in the oil and keep it aside for about an hour.
Pre-heat the oven to 200 degrees.
Once the dough has doubled, make equal spaced indentations with your forefinger. Spoon in the herb mixture along with oil to these indentations and also brush the surface with oil.


Place it in the oven and bake for about 15 min. If you are using only maida, then baking time may vary between 18-20 min. In case of using atta, you need to be careful about the time as atta gets baked pretty fast, after which it hardens.
Enjoy it with your favorite stew or olive oil or just like that (like I did).
Ingredients
Instant yeast - 2 tsp (i used little more than the original recipe since I was using atta)
Milk - 1 1/3 cup
Sugar - 1 tsp
Combine lukewarm milk and sugar. Sprinkle yeast over it and keep it aside for almost 10 minutes.
Whole wheat flour (I used Ashirwad Atta) - 1 1/2 cups
All purpose flour - 1 3/4 cups
Salt - 2 tsp
Olive oil - 3 tbsp (slight variation from original recipe which called for 2 tbsp, just because I love olive oil)
Attach dough hook to the stand in mixer. Sieve and add whole wheat flour to the bowl. Add maida, salt and olive oil. Give it a good mix. Add the yeast mixture and knead the mixture for about 5 minutes. I didn't need to add any more water, and the dough consistency (smooth and pliable) was perfect. Take it out of the bowl and knead with your hand for couple of minutes more. Slightly dust a clean surface and roll the dough in a rectangular shape. Slightly grease a 9 X 12" baking tray (using olive oil) and place the rolled out dough in this. Press and spread using your palms to fit in the tray. Cover with an aluminium foil and place it in a warm place for about 1 1/2 to 2 hrs till it doubles the volume.
Meanwhile prepare the herb infused olive oil, as mentioned below.
Olive oil - 1/4 oil
Basil leaves - 8 leaves , chopped
Rosemary (I used fresh) - 2 small sprigs
Garlic - 1 pod, crushed
Heat the olive oil and switch off when warm. Add the herbs and garlic in the oil and keep it aside for about an hour.
Pre-heat the oven to 200 degrees.
Once the dough has doubled, make equal spaced indentations with your forefinger. Spoon in the herb mixture along with oil to these indentations and also brush the surface with oil.
Place it in the oven and bake for about 15 min. If you are using only maida, then baking time may vary between 18-20 min. In case of using atta, you need to be careful about the time as atta gets baked pretty fast, after which it hardens.
Enjoy it with your favorite stew or olive oil or just like that (like I did).
Kerala Jam Roll / Swiss Rolls
Certain images get etched in your mind forever! One such is the sight of pretty jam rolls sitting happily in the bakery shelves in Kerala. We got to eat these only on special occasions like birthdays or other celebrations. Just the sight of it is enough to make us drool. They are amazingly soft and sweet pieces of cake rolled in with the goodness of jam.
I have never seen them in bakeries in Dubai. So thought of making them at home to give an opportunity to my kids to enjoy what their parents devoured as kids!!

Ingredients
All purpose flour - 100g
Castor sugar - 100g
Eggs - 4
Mixed Fruit jam (warm - I used Kissan) - 6 tbsp


Method
Pre-heat oven to 200 degrees. Put the eggs and sugar in a deep bowl and beat on high using a hand-mixer. Keep beating till you get a rich creamy mousse like consistency. It will take about 10 minutes to reach this stage. By now, the quantity would have almost tripled. Now slowly sieve the flour into the egg-sugar mixture. Combine using cutting action, not allowing any air to escape (you need that air for the fluffy rolls). It will take some time to combine everything, don't hurry!
Lightly grease a 9 X 12'' tray and line it with baking sheet. Carefully transfer the mixture to the tray and place it in the oven. Check after 10 - 12 minutes, it should be done.
Warm the jam and keep it aside.
Take the tray out of the oven. Place a baking sheet on the flat surface and slightly dust it with flour or icing sugar (I missed this and my cake slightly broke while rolling as it got stuck to the sheet!). Now slowly turn the cake from the tin onto this prepared sheet. Spread the warm jam on the top of it. Start rolling the sponge from the short side, till you reach other end (need to be done slowly and carefully). When you reach the end, hold it in position for approx 1 min. Remove the crusty edges. Cut into thin slices and enjoy!
Lessons Learnt!!
1. You have to be really fast while making the sponge. So make sure all ingredients are measured and kept ready for use before you start. The air that is built up in the egg-sugar mixture while beating (for 10 min) is what gives spongy texture to the roll. So if you take too much time after air is built up, there is a threat that you might lose all the air and the cake will end up hard.
2. I checked the cake after 10 min and the skewer came out clean, so took the cake out. But guess I should have waited for couple of minutes more so that the cake would have nicely browned and wouldn't have broken while rolling.
3. Unfortunately my baking sheet got over while I was about to bake and was forced to use aluminium foil. But the cake stuck to it and was difficult to separate it. So please ensure you have enough baking sheet or parchment paper in hand!
4. If you don't flour the surface to which you overturn the sponge (after baking), there is a high probability that the cake will break while rolling.
I have never seen them in bakeries in Dubai. So thought of making them at home to give an opportunity to my kids to enjoy what their parents devoured as kids!!
Ingredients
All purpose flour - 100g
Castor sugar - 100g
Eggs - 4
Mixed Fruit jam (warm - I used Kissan) - 6 tbsp
Method
Pre-heat oven to 200 degrees. Put the eggs and sugar in a deep bowl and beat on high using a hand-mixer. Keep beating till you get a rich creamy mousse like consistency. It will take about 10 minutes to reach this stage. By now, the quantity would have almost tripled. Now slowly sieve the flour into the egg-sugar mixture. Combine using cutting action, not allowing any air to escape (you need that air for the fluffy rolls). It will take some time to combine everything, don't hurry!
Lightly grease a 9 X 12'' tray and line it with baking sheet. Carefully transfer the mixture to the tray and place it in the oven. Check after 10 - 12 minutes, it should be done.
Warm the jam and keep it aside.
Take the tray out of the oven. Place a baking sheet on the flat surface and slightly dust it with flour or icing sugar (I missed this and my cake slightly broke while rolling as it got stuck to the sheet!). Now slowly turn the cake from the tin onto this prepared sheet. Spread the warm jam on the top of it. Start rolling the sponge from the short side, till you reach other end (need to be done slowly and carefully). When you reach the end, hold it in position for approx 1 min. Remove the crusty edges. Cut into thin slices and enjoy!
Lessons Learnt!!
1. You have to be really fast while making the sponge. So make sure all ingredients are measured and kept ready for use before you start. The air that is built up in the egg-sugar mixture while beating (for 10 min) is what gives spongy texture to the roll. So if you take too much time after air is built up, there is a threat that you might lose all the air and the cake will end up hard.
2. I checked the cake after 10 min and the skewer came out clean, so took the cake out. But guess I should have waited for couple of minutes more so that the cake would have nicely browned and wouldn't have broken while rolling.
3. Unfortunately my baking sheet got over while I was about to bake and was forced to use aluminium foil. But the cake stuck to it and was difficult to separate it. So please ensure you have enough baking sheet or parchment paper in hand!
4. If you don't flour the surface to which you overturn the sponge (after baking), there is a high probability that the cake will break while rolling.
Subscribe to:
Posts (Atom)